Tuesday, 26 March 2013

How to wrap the perfect gift

It is my Moms birthday tomorrow and she and my dad are coming down to visit me in Winchester on Thursday so I have spent my day today wrapping her present. I would love to be able to show you what I got her but that will have to wait until Thursday!

I think it is really important to have a beautifully wrapped present, what's the point in spending hours picking a well thought out gift and then just chucking it in a gift bag?! I love to use bold papers and colours when I present my gifts, try using lots of different wrapping papers too, it makes everything look more exciting! Also try sticking shapes and other objects to your paper, one of my favorites is attaching masking tape to the paper to write messages on, its a good alternative to a gift tag and because masking tape is partially transparent, you ca still see your gift wrap underneath.

Why not try making your own gift bows, they are super easy. All you need is strips of paper, a stapler, buttons and super glue. 
Make loops out of the paper, overlap them and staple together in the centre, then use a bit of super glue to stick a button down, to cover the staple, easy!!

Tomorrow I will be making some birthday cupcakes, so come back and have a look if you want to now how to make royal icing flowers.


Monday, 25 March 2013

Mondays Armchair Activity


Mondays Armchair Activity is a fun one today!! We are going to be making bird bunting!

Todays you will need:
  • a mix of papers
  • string
  • scissors
  • pritt stick
  • a pen


Step 1. Fold your chosen piece of paper in half and draw your idea of a bird shape, keeping the fold of the paper across the top of the bird

Step 2. Cut your bird shape out

Step 3. Cut out some little wings using a contrasting type of paper

Step 4. Glue the wings to your birdie, I have glued them only by one edge so that they flap like a real wing

Step 5. Draw a beak and eyes onto your bird

Step 6. Make some more little birds, vary the size, vary the paper, vary the style... go wild

Step 7. Put a layer of glue down the middle of the inside of your bird and lay them over your string, that way they are attached but are still open at the bottom, giving some depth.

And thats it done, go and hang your birdies!


Friday, 22 March 2013

Help a brother out


So in a short space of time, we accumulated a lot of attention, but now we need to start bringing in some new folks, to share all of our projects and ramblings with and this is why, we are offering a special present to our 100th like on Facebook, so come on everyone get talking to you friends and family. Hopefully we will be able to reach our target in no time.

On a different note, I was having a look online and came across "project life", I think it is such a lovely idea, scrap booking your life and actually doing something with all of these thousands of pictures we take! Most of them just end up on facebook and get forgotten about. The only problem with "project life" is that it's so expensive. So now I plan to do my own version, sound like a good plan? I'll make sure I share it with you.

Thursday, 21 March 2013

Trellis update

Today I went printer shopping, I am now the proud owner of a new white cannon pixma printer, it feels pretty damn good to be able to actually finish off all of my projects and this means that soon I will be able to show you all the packaging for my bunting. 

Other than that I also went plant shopping, I am becoming a bit of a regular at homebase. Yes it's sad but it does mean I have been able to do a little more of my trellis, which has brightened up the garden a tad in this awful weather! I only need a bout another million jars and tins to finish it off now....!


Tuesday, 19 March 2013

Wedding Cupcakes


Following yesterdays cupcake themed cop out, I thought I would share some pictures from my cupcake search today. I focused on floral themes, because one; floral cupcakes suite wedding and two; I am bloody good at making fondant flowers!! I'm not sure what colour theme we will be using just yet, but ill keep you updated, I personally like the wild garden, multi coloured look.. but we shall see!

Monday, 18 March 2013

Mondays Armchair Activity

This, I am afraid to say, is a bit of a cop out activity, although saying that it did still take me 3 hours!!! I will be doing a wedding cupcake tower in September and thought I had better start practicing my recipes again. So naturally, I made vanilla sponge cupcakes filled with white chocolate cream and topped with buttercream icing and fondant flowers and I ate a couple of them in my armchair, so that counts right..??


Thursday, 14 March 2013

homemade bruschetta


Good day to you, just a quick one today. Have a look at Rich's gorgeous homemade bruschetta, on the herby bread I made yesterday mmmm yummy!! the last picture is of some new bunting, I am making, it'll be u for sale very very soon, colours are gorgeous eh?!

Wednesday, 13 March 2013

A simple bread recipe


  • Ingredients 


    500g/1lb 1oz strong white bread flour, plus a little extra flour for finishing
  • 40g/1½oz soft butter
  • 12g/2 sachets fast-action dried yeast
  • 2 tsp salt
  • about 300ml/10¾fl oz tepid water (warm not cold – about body temperature)
  • a little olive or sunflower oil

    Step No. 1

    Pop the flour and butter into a large mixing bowl, then make sure to add the salt at one end and the yeast at the other, otherwise the salt will kill the yeast and you'll have deflated bread. Now mix together your ingredients with a spoon.

    Step No. 2.

    Add about half of the water, and now either begin turning everything around with your fingers or you can use an electric mixer fitted with a dough hook, I found the latter a much easier option. Keep mixing everything round until you have picked up all of the flour, you may not need to use all of the water, you want your dough to be soft and silky feeling, not stodgy or sticky.

    Step No. 3.

    If you are using your hands then you now need to begin kneading your dough, lightly oil a clean work surface and pull your dough out from the corners and fold into the center, then use your knuckled to push down and roll it around a bit (like they do on telly). If your using an electric mixer then keep it going for about five minutes.

    Step No. 4.

    Now lightly oil your mixing bowl and pop your dough back inside, with a damp tea towel over the top for about 1 hour. This will give your dough a chance to rise, it should almost double in size over the hour. Don't leave your dough somewhere to warm otherwise it will rise to quickly.

    Step No. 5.

    Right so an hour has gone by, go back to your dough, turn it out of the bowl and begin  kneading it again to knock all the air out. Do this for another 10 minutes and then you can add any tasty ingredients. I have gone for some herbs, cheese and onion, but you should experiment with what you like. 

    Step No. 6.

    Now lightly oil your baking tray and then shape your dough, either use a loaf tin or you can freestyle (like my attempt at a platted loaf of bread. At this point you will need to preheat your oven to 220C and pop an old empty roasting tin in the bottom of the oven. Now leave your loaf to rise again for another hour with damp tea towel over the top.

    Step No. 7.

    After an hour go and pop your bread in the middle of the oven, pour some cold water into the empty roasting tin, this will create steam and give a lovely hard shiny crust to your bread and now bake your loaf for about 30 minutes.

    Step No. 8.

    After half an hour, check your loaf is baked by tapping it, if it sounds hollow its time to take it out the oven and turn on to a wire rack to cool and now you eat it, done!!


Tuesday, 12 March 2013

This did not go well

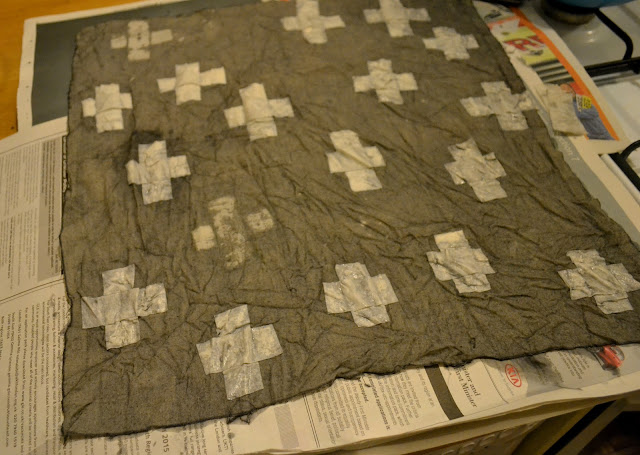
I thought I would share with you, something that went really wrong today! The idea of what I was doing would have worked with a little bit of tweaking but I thought it important to share the big failure with you instead! This is the horrible risk the crafting brings with it... well that is a little more dramatic then it actually is, basically sometimes things go wrong but as long as you learn from the the worst that can happen is that you'll waste some materials and at least you will learn something eh?!

So I was attempting to dye some fabric, having blocked out little crosses with masking tape, these are the bits I wanted to stay white and the rest of the fabric I would dye black. This would have worked if I had used a better quality masking tape, like frog tape or if I had painted the dye on instead of immersing the fabric in the liquid. But hey ho such is life!


Here though is something that did go right (yay!), My blackboard pot plant. It's not quite done yet but I thought the fact that it does actually work as a blackboard was far to exciting to wait to share it with you... so here it is:


Monday, 11 March 2013

Mondays Armchair Activity

Hello Hello

Today I am showing you how to do a very simple decorative, spring wreath, all you will need is: 

  • a polystyrene ring, available from all craft shops
  • string
  • glue (pritt stick and the super variety)
  • paper, I have chosen brown
  • buttons and other decorative objects
  • handmade paper fans


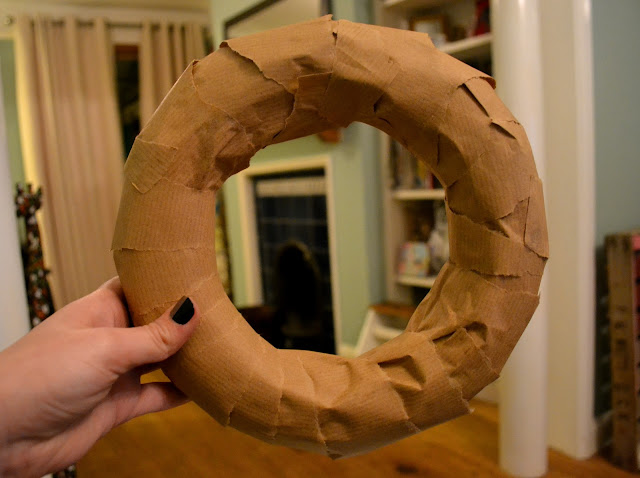
Step 1. Tear long strips of paper, I have ripped both edges because I wanted a softer approach, but you could cut straight edges if you like. Then put some pritt stick on to your polystyrene ring and begin wrapping the paper round until it is completely covered.


Step 2. Now you can start applying your decoration, I have begun by adding a paper doiley to break up the circle.


Step 3. Now you can add all of your pretty little bits. I have made some little fans out of some of my favorite paper, use super glue to add them at different intervals for texture. Once you have done tat you can add some little buttons or skeleton leaves, then finish it all up using some hessian string to hang up your wreath!


Easy peasy!! you can use anything you like to decorate your wreath and obviously they can be altered for different seasons, why not try wrapping your wreath in wool and stitching on buttons etc! Good Luck, nanight!

Friday, 8 March 2013

Rain

 I has rained all day today and I have had enough, so excuse the poor quality of these pictures, I was trying to hang the flowers whilst getting soaking wet, bllaaauugghh!!
And that is pretty much all your getting today, along with a sneaky peek pic at some more glasses I am doing, they were old candle glasses, they will make quite good plant containers! Have a very good weekend, hopefully It will be rain free!


Thursday, 7 March 2013

Flowers... Finally

We picked up our new car today, which means that I was able to go and finally buy some flowers for the can and jar that I painted the other day. All I need to do is put them in the garden now, which I would have done today had it not been tipping it down!
Whilst buy flowers I also picked myself up some chalk board paint, which I used to paint the teracotta pot in the bottom picture in (the black one), I painted the other two pots in my fav blue colour. I am going to add some lace and a bow and they will go on my market stall, which hopefully I will be getting for May time. I had been offered a place on the March market but it's too late notice for me to get the day off work now. Keep an eye on this space, because I am going to be spending a lot of my time from now on making stock for my market stall and I will of course keep you all updated.. exciting eh!?

On a separate note, Bertie the blue side table has sold and will be off to his new home very soon, yay!!